![Firdasyah Experiences [Microsoft System Infrastructure]](https://blogger.googleusercontent.com/img/b/R29vZ2xl/AVvXsEgkTtVjci_zZoefCBUx0aKuZaQFVkeklRC8p9qbKK-WNE1eN-l1r7v9NJWn4iSCrDfRqi50LtHQPVyBa-VXrOf-VSuqQ1cVylh4-vcLJlGEF2-rGYQtuIn-toXM1FmnwmhPJMEysevIWUMa/s1600/Untitled-1.png)
Hi! Last time, my customer contact me and raised the issue regarding their SCOM Reporting server. They told me their SCOM not producing report. Before re-install, make sure backup SCOM MP that contain the custom reports. Let start the configurations!
Step 1: Uninstall SCOM Reporting Server Features
1. Open Control Panel and click on Programs and Features


3. Click on the Remove a feature

4. Tick on the Reporting Server and click Uninstall

5. Once complete click Close

Step 2: Delete ReportServer Database from Microsoft SQL Server Management Studio
1. Right click on the ReportServer&SCOM2012R2TempDB and delete the database
* Make sure to tick;
- Delete backup and restore history information for databases
- Close existing connections

2. Open Program and Features, double click on the Microsoft SQL Server 2012 (64-bit)

3. Select instance for the Reporting and click Next

4. Tick on the Reporting Services – Native and click Next

5. Click Next

6. Click Remove

7. Click Close

Step 3: Install Reporting Server for SCOM
1. Open Program and Features, double click on the Microsoft SQL Server 2012 Setup (English)
2. If you see Status Failed, then you need to solved which rule getting error. For me, I just need to restart the server once.
 3. On the installation type, choose instance that you want to install Reporting Services and click Next
4. Select on Reporting Services – Native and click Next

5. Click Next

6. Click Next

7. Enter account name and password for SQL Server Reporting Services and click Next

8. Select Install only and click Next

9. Click Next

10. Click Install
 11. Once installation completed, click Close
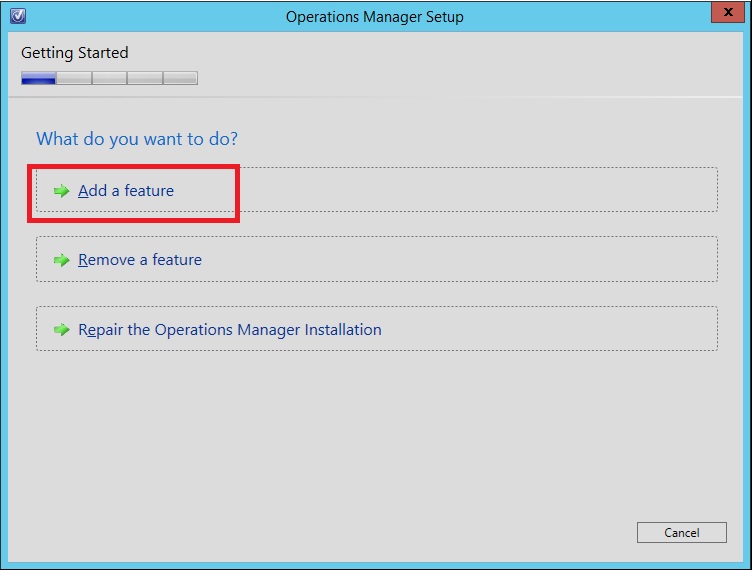
Step 4: SCOM Reporting Services Installation
1. Open System Center Operation Manager Installer and click Install

2. Click Add a feature
3. Select Reporting Server and click Next
 4. Click Next
5. Select Server Instance and click Next

6. Enter Data Reader account and click Next

7. Click Next

8. Click Next

9. Verify and click Install

10. Click Close

No comments:
Post a Comment